Posted by Jayesh Yewale
Posted on 1:35:00 PM
with No comments
In the future, everything will be connected to the internet. And all restaurants will be Taco Bell!
The idea of pervasive connections between physical objects and the online world.
These connected devices don’t just idly sit around waiting for commands or files.
They’re active agents that anticipate your needs and can push or pull data from the internet.
Our Internet of Things Printer is a small, internet-connected thermal printer that can have a daily weather forecast ready before you head out in the morning, a puzzle to work on while riding the subway, provide a list of “tweets” relating to your interests or any other task you can program!
This second version of the printer is built around the Raspberry Pi, a tiny computer that packs a wallop:
more processing power, more RAM and the potent Linux operating system.
The new kit has an easier time handling graphics and looks super tidy with its wireless networking:
Complete Tutorial @ http://learn.adafruit.com/pi-thermal-printer?view=all Download PDF @ http://learn.adafruit.com/downloads/pdf/pi-thermal-printer.pdf
Posted by Jayesh Yewale
Posted on 11:58:00 PM
with No comments
People have been asking me about interesting applications for the Raspberry Pi, and whether Raspberry Pi is an Arduino killer of some sort. The answer to the second question is no; in fact it is an Arduino augmenter. This blog post answers the first question with another question: how about a Haunted House sound effects machine?
A new revision of the Early Release of Getting Started with Raspberry Pi came out last Friday. I read Matt Richardson’s chapter on using Pygame with the GPIO pins on the Pi, which included a simple Sound Sample player. I adapted his example to work with an Arduino that talks to the Pi over a serial connection; this skeletal (ahem) hookup could easily be incorporated into some sort of Halloween installation. I decided to use Arduino for reading the inputs because out of the box it is more robust and can handle a wider variety of inputs. Also, there are many existing Haunted House triggering demos out in the wild that use Arduino.
First, you’ll need to prepare the trigger circuit. The following example uses three toggle switches, but you can replace those with any kind of on/off input. In a haunted house (or porch-based trick-or-treater installation), a PIR sensor would be handy for triggering based on proximity.
Here’s the basic schematic:
The 10k resistors can be replaced by the Arduino’s own internal pull-up resistors, if you know how to do that.
I connected the Arduino to the Raspberry Pi using a USB cable. While I had the Pi hooked into a monitor, I found that I could just plug the Arduino through my Mac keyboard USB connector and it got enough power from that to work. If you have an older Raspberry Pi with polyfuses limiting the power on the USB port (check to see if you have 2 little green fuses marked “1104″ next to the USB ports), you may need an external hub, or run the Pi headless to free up a USB port.
Next, upload the following sketch to the Arduino:
// PiTalk.ino// Reads three digital inputs. These could be any kind of // switch or (for Halloween) PIR sensors.byte onState[3] = { 0, 0, 0 }; // save the state of each pinvoid setup() { Serial.begin(9600); // Open serial connection pinMode(2, INPUT); // Set these three pins for reading pinMode(3, INPUT); // Each have a 10k pullup externally pinMode(4, INPUT); // so a trigger is LOW}void loop() { for (int i=0; i<3; i++) { // Iterate over pins if (digitalRead(i+2) == LOW) { // Check if triggered if (onState[i] == 0) { // Just triggered? Serial.write(i+2); // Send the pin number onState[i] = 1; // but just once } } else { onState[i] = 0; // Not triggered } } delay(20);}You can use your computer to do upload the program, or you can download and install the Arduino IDE directly on the Raspberry Pi (as described in the next release of Getting Started with Raspberry Pi).Once the Arduino is programmed, open up the Leafpad text editor on the Raspberry Pi and enter this Python program, adapted from Matt’s Sound Sample Player:# playSounds.pyimport pygame.mixerfrom time import sleepfrom sys import exitimport serialpygame.mixer.init(44000, -16, 1, 1024) soundA = pygame.mixer.Sound("Scream.wav") soundB = pygame.mixer.Sound("WilhelmScream.wav")soundC = pygame.mixer.Sound("CastleThunder.wav")soundChannelA = pygame.mixer.Channel(1) soundChannelB = pygame.mixer.Channel(2)soundChannelC = pygame.mixer.Channel(3)print "Sampler Ready."serialFromArduino = serial.Serial("/dev/ttyACM0",9600)serialFromArduino.flush()while True: try: val = ord(serialFromArduino.read()) print(val) if (val == 2): soundChannelA.play(soundA) if (val == 3): soundChannelB.play(soundB) if (val == 4): soundChannelC.play(soundC) val = 0 sleep(.01) except KeyboardInterrupt: exit()
Save it as playSounds.py. Before you run the script you’ll probably need to install the Python serial module. To do that, type:
sudo apt-get install python-serial
If you’re running the latest Raspbian, you probably have everything you need to get this running. Open the LXTerminal and type:
python playSounds.py
If you get an error that Pygame is not installed, type:
When you press the buttons each sound will play once; Pygame’s mixer will even play all three at the same time if you have multiple trick-or-treaters invading your porch
Posted by Jayesh Yewale
Posted on 10:35:00 PM
with No comments
When we have a meeting in a meeting room, we need to connect our laptop to a projector to show our desktop. But sometimes, several persons need to show their desktop, they need to change their laptop. This is complex and waste some time.
Currently, we have some mobile project, they are can be run in android/ios system. Before publish the project, we need to demo it to our team members or other guys. It is hard to demo them( in a phone) in the projector.
What I want to do is:
1. Write a video player in Raspberry Pi
2. Connect the Raspberry Pi to the Projector or TV
3. Write a desktop capture in a pc/mobile phone, and send the data to the Raspberry Pi
4. Who want to show their desktop in a pc/mobile phone, run the program to connect Raspberry Pi and it will show it in the Projector/TV
Step 1: Port FFmpeg/SDL to Raspberry Pi
How to write a video player in Raspberry Pi?
1. Port FFmepg/SDL to it.
2. Write a server program to accept the pc/mobile phone to connect it
3. Call ffmpeg to play the network data.
Step 2: Implement the desktop capture in a pc
Implement the desktop capture in a pc.
1. Connect it the Raspberry Pi
2. We can call the system API to capture the desktop
3. Encode the data to h264 video.
4. Send the data to Raspberry PI
Step 3: Implement program capture in a mobile phone
Implement program capture in a mobile phone.
1. Connect it the Raspberry Pi
2. Find a way to capture the program UI
3. Encode the data to h264 video.
4. Send the data to Raspberry PI
Posted by Jayesh Yewale
Posted on 12:19:00 PM
with No comments
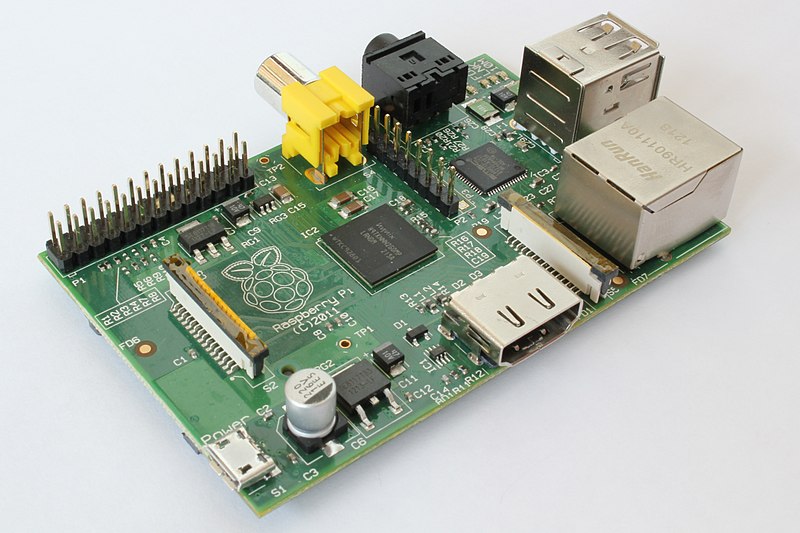
Hello TC fans From Today onward We Are Going To Explain to About The Latest Module Discovered In Electronics History Called As " RASPBERRY Pie" And The Projects Based On It...
Developer
Raspberry Pi Foundation
Type
Single-board computer
Release date
29 February 2012
Introductory price
US$ 25 (model A) and US$ 35 (model B)
Operating system
Linux (Raspbian, Debian GNU/Linux, Fedora, and Arch Linux ARM) RISC OS, FreeBSD,NetBSD, Plan 9
Power
2.5 W (model A), 3.5 W (model B)
CPU
ARM1176JZF-S (armv6k) 700 MHz,Raspberry Pis can dynamically increase clockspeeds, and some can temporarily reach speeds up to 1 GHz.
Storage capacity
SD card slot (SD or SDHC card)
Memory
256 MByte (Model A) 512 MByte (Model B rev 2) 256 MByte (Model B rev 1)